
Near-death Experience (how I killed my hard drives)
Disclaimer: I wrote this blog post to document my experiences. It is possible to damage your HDD beyond recovery if you don't know what you're doing. This is not a how-to guide. If in doubt, take it to a professional.
I recently decided that my PC was too noisy (at the point when I realised I could hear it from the kitchen!). The two main sources of noise were the tiny fan built into the motherboard I/O backplate (to improve it's appeal to gamers), which was spinning at 10,000 RPM; and the PSU, a cheap-ish Aerocool semi-modular unit with a fairly audible fan.
I simply unplugged the motherboard fan - I suspect that it's net contribution to reducing the case temperature was probably negative. I decided to splash out on a shiny new Seasonic PSU (~20 dBA, silent for all practical purposes).
Unfortunately, when I plugged everything back together, I accidentally used the modular SATA cables from the old PSU. Needless to say, the pin-outs were not the same!
I pressed the power button.
The fans spun briefly.
There was a big, fat spark.
The magic blue smoke escaped from something.
In one stroke, I had accidentally killed all three of my storage drives (an SSD and two hunks of spinning rust). The DVD-RW drive survived unscathed, although this offered little comfort.
I decided that only one of the drives was worth recovering. The SSD only contained Windows and software installations. The smaller HDD contained my Steam library, all cloud synced. The remaining HDD, on the other hand, contained all the RAW files for my photographs - including two holidays, one of which was a friend's wedding. My most recent backup was six months previous.
TVS diodes
After some frantic googling, I discovered that hard drive PCBs are usually protected from brief spikes of overvoltage using TVS Diodes. There is usually one diode for the 5V supply, and one for the 12V supply. I was able to identify the TVS diodes on my drive (an old Seagate Barracuda 7200.10) from a picture online.
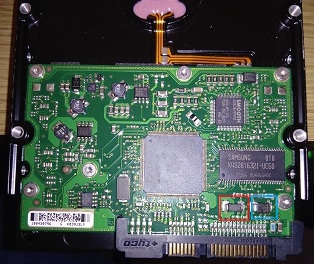
Figure 1 - Seagate Barracuda PCB showing TVS diodes
I tested the diodes with a multimeter and found that:
- The diode highlighted in red (QE R805) presented practically no resistance (reading ~0.005Ω).
- The same diode presented either no voltage drop or a very small value (0.001 V) in both directions when using the diode test mode.
- The diode next to it (BUX C749) presented a voltage drop of 0.75 V in one direction and OL in the other. It also presented significant resistance (Infinity until I used the 20k Ω setting).
From what I'd read, this indicated that the red diode had shorted - meaning that it had potentially contained the voltage spike and prevented damage to other components on the PCB.
I called a couple of local IT businesses who advertised specialism in data recovery, hoping that I had done sufficient diagnostic work to get an idea of a price. Their quotes rather put me off the professional recovery route unless I had no other choice.
The internet to the rescue
Through reading various forum posts, I came across hddguru.com. The forums seemed to be full of people with HDD problems, but, more importantly, they were also full of people giving apparently sensible advice! I posted my particular scenario along with the DIY diagnostics I had carried out. I soon got a reply advising me what to do next.
I tested the continuity between the 12V and GND pins on the HDD power connector (using the 200Ω resistance setting as my multimeter does not have a dedicated continuity test mode). This showed infinite resistance (i.e. open circuit) as expected. I then tested between 5V and GND -this had practically no resistance - short circuit! This suggested that the red diode was the 5V TVS, which I confirmed by searching for the code printed on the component surface.
The most comforting thing that I discovered at this point was that my drive was sufficiently old that a replacement PCB only needed to match the firmware version printed on the drive cover. More modern drives have a ROM chip on the PCB that contains code unique to the drive, which puts a crimp on DIY PCB replacement as you also need to transfer this chip to the donor PCB - delicate soldering work with disastrous consequences should it go wrong.
I found a used drive on eBay with the same firmware version for £18.50 posted, (i.e. 10% of the lower-bound cost of professional recovery!)
Feeling a little more adventurous now that I knew I had a replacement board to hand, I removed the 5V TVS diode from the original PCB. Testing between the 5V and GND power pins now showed an open circuit. The short was fixed! However, removing the TVS diode left the drive with no overvoltage protection, and I wasn't keen to connect it to power with my photos onboard.
When the donor drive arrived, I ran a battery of tests on the drive using SeaTools for Windows. Satisfied that it seemed to be working correctly, I swapped the PCBs over.
I first connected the donor drive (with the patient PCB, missing it's TVS diode) to the PC and powered it up. The drive appeared in Windows Explorer and I was able to copy files to it. Encouraged by this success, I connected the patient drive. A couple of hours later, I had recovered all 376GB of content from the drive!
Learning points
- "If you only have one copy of a file, you do not have any copies of that file".
- Back up.
- Back up.
- Back up.
Thanks
A massive thank you to rogfanther and fzabkar on hddguru.com for their incredible help and patience!