
Securing your IIS site with Let's Encrypt and WACS
The success of the Let's Encrypt means that it has never been easier or cheaper to secure your website (or web app) with HTTPS. This post is a guide on how to use Let's Encrypt to secure your IIS-hosted website.
Background
Let's Encrypt provides a free and automated service which allows you to generate and renew a 90-day TLS (SSL) certificate. Let's Encrypt uses a protocol called ACME (Automatic Certificate Management Environment) to communicate between a client installed on your web server and the Let's Encrypt certification authority. ACME is an IETF standard and eventually CAs other than Let's Encrypt may support it.
Windows ACME Simple (WACS) is an open-source command line ACME client for Windows and the IIS web server.
Installing a TLS certificate using WACS
The latest build of the WACS client can be downloaded from the releases page of the win-acme Github repository (scoll down to the Assets section).
Download the win-acme.vx.x.x.x.zip file (i.e. not the Azure / Dreamhost / Route 53 builds) onto your web server and unzip it somewhere convinient - for this example, I extracted it to C:\Apps\Management\acme-win-simple.
Run wacs.exe to start the client. You will be presented with a menu:
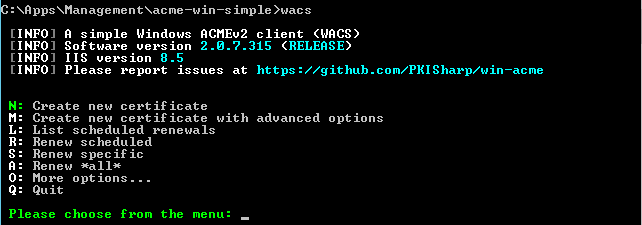
Press N to create a new certificate.

Press 1 if your IIS site has a single binding, or 2 if you want to cover all bindings of the same site (e.g. both example.com and www.example.com).
I chose 2 since my IIS site is bound to both benjaminowen.uk and www.benjaminowen.uk.
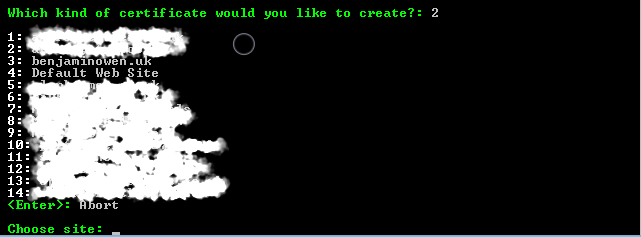
You will then be prompted to choose an IIS site to apply the certificate to.
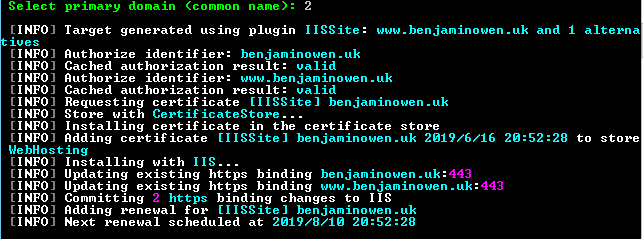
If you chose option 2 (SAN certificate for all bindings of an IIS site) in the previous step, you will be prompted to select the primary domain name for the certificate.

WACS will now request and install a certificate for the selected domain(s) / subdomain(s), and configure the IIS bindings to use the new certificate.
The certificate is also scheduled for automatic renewal.
Redirect HTTP requests to HTTPS
Now that you have set up a HTTPS binding, you can force all traffic to use a secure connection via the IIS URL Rewrite module. You might need to install this via the Web Platform Installer.
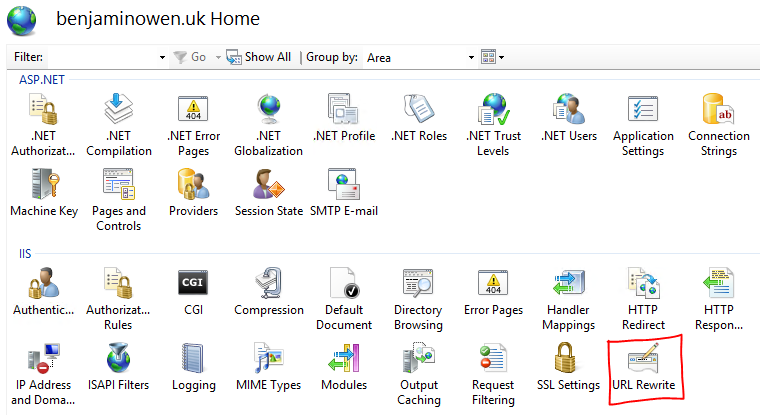
Click on the Add Rule(s) action link in the right-hand sidebar and select Blank rule.
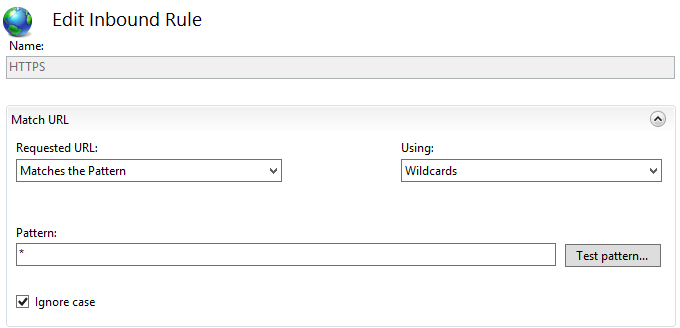
Enter a rule name (I called it HTTPS)
In the Match URL section:
- Set
Requested URLtoMatches the pattern - Set
UsingtoWildcards - Set
Patternto*
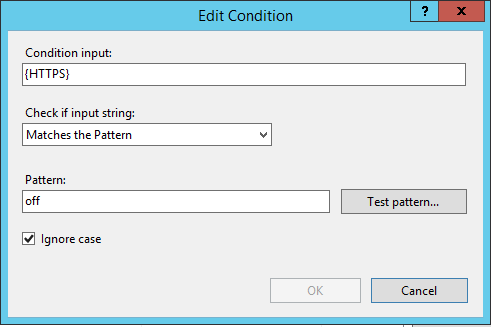
In the Conditions section:
- Set
Logical groupingtoMatch Any - Add a new condition
- Set
Condition inputto{HTTPS} - Set
Patterntooff
- Set
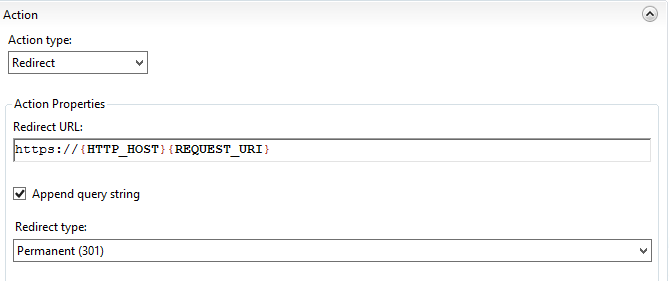
In the Action section:
- Set
Action typetoRedirect - Set
Redirect URLtohttps://{HTTP_HOST}{REQUEST_URI} - Leave
Append query stringchecked - Set
Redirect typetoPermanent (301)
Apply the new rule and test visiting both the HTTP and HTTPS versions of your site, ensuring that you always end up on the HTTPS version.
